
Collecting & Carrying Water
Carrying a supply of water is a basic requirement most of us tend to do out of necessity when we paddle, particularly on longer trips when we are concerned about dehydration or simply want to be assured of a refreshing drink whenever the urge arises. What if your supply suddenly disappeared? What if you capsize and your water jugs sink to the bottom or float away?
Whatever the cause, losing water is a serious problem, even potentially lethal on a hot, sweaty day trip. Do you know ways to seek and collect water in an emergency situation? Can you collect enough to satisfy the basic needs of yourself and paddling companions?
There are several ways to get water in the field. Some are as simple as dipping a cup into a stream, while another takes about as much effort as it does to wipe off a table after a meal. Some ways are more convoluted, looking like a bizarre high school science project. They all produce water depending on a variety of conditions.
Lakes and streams are the obvious first sources of water in the field. We have no trouble finding it, just look beyond the end of our paddle!
Two concerns for most emergency water gather are filtering out the larger particulates (fragments of leaves, twigs, visible critters, etc.) and ridding the water of any chemical or biological contaminants. Filters can be as simple as straining water through a cloth (your shirt tail? a bandana?) or creating a cylinder filter from a sock or sack that is filled with small gravel, sand and charcoal.
There are chemicals you can use (iodine, bleach) to help kill critters and there is always boiling water. 180 degrees or so will kill most critters, but since you don't have a thermometer in the field, bringing water to boil (212 degrees) you know you have clearly killed off the bad guys.
One tip on chemicals: If you are using iodine or bleach to purify water in a container, loosen the cap on the container and shake it a few times so the treated water can slosh around the grooves in the cap. Even a drop or two of the tainted water trapped within those grooves can enable the contaminants to continue to cause problems.
Without a stream or lake or similar body of water, the best way to provide drinking water is to collect it in one of its various natural forms and convert it to drinking water.
Collecting Run-off: This is about the easiest way to gather adequate amounts of relatively clean, drinkable-from-the-bucket rainwater. Basically you use the side of your tent or dining tarp to form a large, shallow "V" so rain falling upon it will be directed to a central low point where it can then be directed into a collecting container or basin and then transferred to whatever storage containers you have (or make).
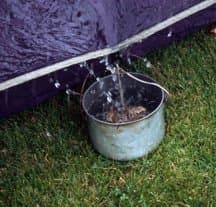
Two pre-rain tasks optimize this form of water gathering. First, make sure the surface of the tent or tarp is clean. Obviously dust and grit and other foreign items are going to be washed down into your containers when it starts to pour. Secondly, make sure this is all set up before it starts to rain! Rigging the backside of the tent or dining tarp – out of the way of traffic – means it’s ready to go and will most likely not be disturbed during most camp activity. It is amazing how much water you can collect after even a brief shower. On a fishing trip on Kodiak Island last summer we collected ten gallons of rainwater in about as many minutes from one 8' x 10' tarp extended out over our cabin’s deck canopy.
All the other ways of collecting water are more difficult or at least more time consuming. Except one. I call it the "Wipe-n-Wring" method of water collecting. The Wipe-n-Wring method involves simply that: Wiping the dew that forms on grasses and foliage in the early hours of the morning and wringing out the cloth to provide cupfuls of water in a very short time. Again the trick is clean foliage, a clean piece of cloth (or your deck sponge if you must) and a clean container. You might pick up a few fragments of foreign material and an insect or two (protein?) but those can be easily picked or strained out of the container before drinking. Sometimes the entire hull/deck of a boat is covered in dew but salt spray and sand can be a major deterrent to a fresh, clean source of condensation.
Other methods of finding direct sources of water include digging above the high tide line on a beach and allowing the lighter fresh water to perk up from the ground and settle on top of the denser salt water. You can scoop off that fresh layer and gather your water one skim at a time. Any time you dig for water, you will need to let that seepage settle out before collecting it. Several seepage holes could provide you with a short-term supply.
The funnel-shaped base of large broad-leafed plants, deep within horizontal crevices of rocks and other natural collecting basins can also be a source of water in an emergency. The only thing worse than collecting water by the capful will be succumbing to dehydration so keep a positive mindset if ever in this situation.
The next series of water collecting techniques are those I liken to the kind of projects you see at science fairs. They involve materials that may not be readily at hand and require a lot of patience. These are the solar/condensation methods of water collecting.
Basic biology taught us that plants transpire – they give off water. If one could collect that water, one would have an emergency lifesaving source. The most common method of collecting and containing water transpired from leaves is to gather clusters of foliage together and place them inside a clear, plastic bag. The idea is that leaves will transpire freeing the water into the air inside the bag. Cool nights will cause the water in the air to condense (the formation of dew) onto the inner surface of the bag. Gravity draws all the drops down the moist sides of the bag and into a collecting corner. Several bags mean multiple sources of water being produced daily. Modifications of this technique are as varied as the materials one could use to create similar condensation capturing devices.
My favorite solar collection method is the Solar Still – and it does make a great science project! These work best in warmer climates. I've had the best success in the warmer regions of the country (beaches in Mexico, for example).
The Solar Still relies on any water-laidened material such as seaweed, grasses or damp clothing and an enclosed system that directs and collects the evaporated/ condensation water from those materials.
Here's how you make a Solar Still: You dig a cone-shaped hole about three feet in diameter and fifteen inches or so deep. You then pile in handfuls of moisture-laden material such as grass, wet seaweed, etc. You spread this material evening up and down the entire slopes of the cone – completely around the hole.
In the very center of the cone, place a clean container (cup, soup can, other?). This will be your water-collecting container. If you have a flexible tube or hose, you can place one end down into the cup. Take the tube and bring it up the side of the cone. This will serve as a straw to withdraw water from the cup as it is collected.
Once all this is in place, take a square piece of clear or opaque plastic sheet (about a 5' square works with a 3' diameter cone). This material is, of course, handily available in an emergency, I’m sure. Lay the plastic out flat across the opening of the cone. Place rocks or other weights all around the rim of the cone to hold down the plastic and keep tension on it. Place a rock in the center of the plastic so it will sag thus forming a cone. That rock should hang directly above the cup at the bottom of the cone.
As the sun heats the air inside the cone, moisture in the material starts to transpire (through vegetation) or evaporate (from wet materials), it will condense on the underside of the plastic cover. It then flows down the sheet to the peak at the center of the plastic. The cone-shaped tip concentrates the drips into the cup as they fall from the peak. Eventually you will have some awful tasting but safe-to-drink water.
The solar still principle can be duplicated using a large basin with the same type of cone-shaped plastic cover. Instead of seaweed or other moisture containing material, salt water or even urine can be used. The evaporation process removes the salts leaving drinkable water in the collection container.
Don't expect any of the "solar" methods to produce copious amounts of water. Several units going at one time does increase your chances.
It pays to try these methods out prior to an emergency to see if there are any problems in your approach – and to see just how much water you can actually collect.
Water Stowage in Boats Since water is a critical need, carry as much of it as possible (one gallon, per person, per day is absolute minimum requirement! – consider twice that in hot weather.) Because water weighs about eight pounds per gallon, many kayakers will distibute that load via several smaller containers throughout their boat. As usual, heavier items should be centered along the keel of the boat and towards the center. In canoes, the water containers can be used to help balance out any weight differences between the bow and stern paddlers.
Large quantities of water are typically carried in gallon or half-gallon containers. Old plastic milk bottles often work well as they are much cheaper when recycled for this use instead of buying commercial collapsible water containers. That's another key: "collapsible". Hard sided containers are harder to pack and take up as much room when empty.
I am a dedicated fan of the "wine box liner" bag as a water container. It folds down to a deck of cards size unit when empty. It can provide flotation for your boat. It's a great "tush-cush" or pillow, its reflective surface can be picked up by some marine radar systems AND it's a great container for water. They can be filled to the spout or partially filled and form fitted almost anywhere in the boat. They are incredibly strong, too.
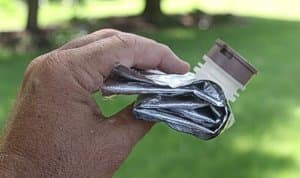
Another novel water container is an extra tuff condom. It looks like a water balloon when filled, but works as a great water container. To ease handling it, cradle it in a sling made from an old bandana. This system fits easily into your pocket until you find a water source.
Most kayakers I know rely on a supply of water bottles stashed strategically about their cockpit and deck – all handy for retrieval throughout the paddling day. You can even get water bottles with filters built right into them which makes quenching a thirst as easy as scooping out a cupful of lake water as you paddle.
There are several more resourceful ways of finding and collecting water in the field. Be very aware that unless its rainwater, chances are you will need to purify it before drinking.
Never underestimate the need to stay hydrated and learn the first aid procedures for dehydration (at least learn the symptoms so you can catch it in its early stages).
Have fun and be safe out there!
EMERGENCY WATER QUICK FIX
One of the quickest ways to get a drink of safe, clean and clear emergency water is to use a water bottle with a built-in purification system. An even simpler means may be to draw the water directly up into your mouth using a straw that filters/purifies everything along the way.
I field tested "My Bottle" by Katadyn and the "Survival Straw". Both methods strain out or kill impurities from minute flotsam to micro-organism 100 times smaller than the diameter of a human hair. The result, at least for my palette, was water as wholesomely tasty as that from my small town Minnesota kitchen faucet.
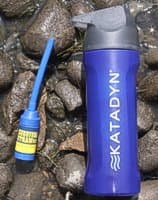
They both seemed to have performed technically. I drank a cup of raw marsh water through each of them without any negative affect. That being said, the Survival Straw was much faster and easier to use than the "My Bottle". The purifier required steady, firm pressure to maintain a steady flow – and then I petered after just a half a bottle. Perhaps I hadn’t primed it enough at the onset?
The straw was as basic as it gets. I chose to fill a cup with tainted water, insert the straw and sip away. I had good tasting water immediately, with no more effort than sipping lemonade.
"My Bottle" does serve as a regular water bottle when its working cylinder is removed (it would have to be thoroughly washed out first). Since both work effectively against a wide range of bad guys, the straw is cheaper, simpler and easier to maintain and carry.
Either could be used right from the boat for immediate access to water right beyond your coaming or gunwales as long as it was not brackish or salt water.
"My Bottle/Katadyn" – multistage water purification system, ViruStat® uses iodine resin to kill 99.9999% waterborne bacteria and viruses (99.99%), 1 micron pathogenic cysts (Giardia) filter, sediment and organic contaminants carbon pre-filter. Retails for about $50.
The Survival Straw – 100% alloy media (natural bactericidal device), Destroys bacteria, virus (E. Coli, Giardia, Cryptosporidia, algae mold and fungi, eliminates heavy metals and carcinogens (pesticides, herbicides, chlorinated hydrocarbons, cloriform and other man-made chemicals, easy-to-clean/no replace filter. Retails from various vendors for about $25-$30.
Tom Watson is an avid sea kayaker and freelance writer. He also posts articles and thoughts on his website: www.wavetameradventures.com. He has written 2 books,"Kids Gone Paddlin" and "How to Think Like A Survivor" that are available on Amazon.com.
Related Articles

Who says that today's paddler should be satisfied with the "eat to live" assumption and limit oneself to…

Exploring the aisles of the local supermarket, I am always astonished to see the variety of canned and…
I learned quite a few lessons from my dad, but one that still holds true both in my day-to-day existence…
Winter of 2007 will be remembered as one of the worst for orange and grapefruit growers throughout…