
On Water Kayak Repair
There will be a time, sooner or later, you or your partner will have to fix something on one of your kayaks while on the water. The repair can be a big one or a small one. Sometimes you will be able to do the repair with all parties sitting in their own kayaks. However, some repairs will necessitate someone getting out of their kayak in order correctly repair the kayak.
Doing this on the water can be difficult but here is a method that gives you the stability needed while you repair the kayak and keeps the paddler out of full submersion. I learned this method from Derek Hutchinson. Derek has shared stories of this method being used in rough seas with successful results. It also provides other alternatives if you need a very stable platform while on the water.
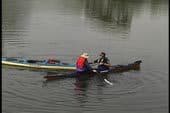
Once you decide an out of the kayak repair is needed raft up in the bow to stern position. The paddler in the damaged kayak will work their way onto the deck of the assisting kayak. You may have to move some deck gear if it is too cluttered. Be careful of the deck mounted compasses that are high profile mounts or brackets.
The use of a paddle bridge makes the transition a bit easier for some folks. I would not use a light weight paddle shaft for bridges that require weight on them.

The paddle of the assisting kayaker could be used to help stabilize the kayaks with a bridge under the arms or it could be put on a paddle leash and draped on the outside.
Once the paddler is on the front deck, they can do an extended sculling brace if support is needed during this transitional phase.
The paddler in the cockpit has the responsibility of turning the kayaks into a "T" position. Once the boats are in the T-position slide the damaged kayak across the cockpit between the two paddlers. Taking advantage of the sweep of the bow and the smooth hull surface of the upright kayak makes it easier to get the kayak over the cockpit. Having deck lines makes this maneuver a lot easier. The support provided by the empty kayak is critical in keeping everyone upright.
It is important for the paddler in the cockpit to have hands free operation. If a paddle leash is not being used the paddle (belonging to the paddler in the cockpit) can be held by the kayaker on the deck. The paddle can be held between the kayak and their leg that is in the water.
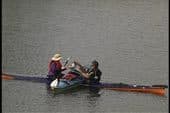
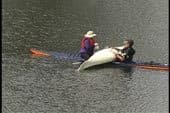
When the damaged kayak is pulled up on the cockpit you will be amazed at the support you have. It would be extremely difficult to capsize given the huge outrigger you now have. Non-leashed paddles can now be placed across the lap of the kayaker in the cockpit.
Now that you have a stable platform and a way to get an unobstructed working area get to your repair kit. If your kayak is not equipped with a day hatch, then I would hope you have your kit behind your seat. The contents of your repair kit is personal to your needs, but it should allow at least temporary repair so you can get back to shore with your kayak.
If you store your kit in the front or rear hatch I would ask you to rethink your strategy. As a general rule I do not recommend opening your front or rear hatches while on the water. Remember, these are your kayak's floatation chambers. That being said, if I had to open a front or rear hatch (a result of poor planning), I would feel better about doing it using this technique because it puts the opening higher above the water and I would be in a better position to open and reseal the hatches.
Keep a sharp eye on your hatch covers. Imagine loosing them while at sea. At no time would I trust the tethers attached to some covers (provided by the manufacturers) while on the water. I find them OK on shore to keep the cover from blowing away but I would not let the cover dangle blindly after opening the hatch. The consequences are to great for me to feel comfortable.
Once the repairs are completed get the repair bag repacked and stowed away. Then reverse the process to get the paddler on the deck back into their kayak.

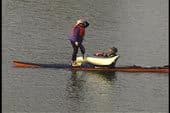
If you wanted to test the stability of this configuration, try standing on the deck. It provides a nice platform to help increase your line of sight over the horizon.
Remember the key points when reversing the process:
- The paddler on the deck will need to use an extended sculling brace if support is needed as the balance changes when sliding the repaired kayak back into the water.
- The paddler in the cockpit needs to have hands free operation so their paddle needs to be stored somewhere other than across their lap.
- Use paddle bridges as needed if the paddle shaft can handle the forces.
- Be sure to thank your partner in the appropriate manner.
In this day of stronger materials being used in constructing kayaks you will probably end up using this technique more often in fixing: rudders, foot tracts and seat backs. As I mentioned earlier I don't like the idea of opening front or rear hatches on the water, but if I had to do so, this method minimizes the risk of flooding the hatches.
Doing the repairs while sitting freely on the deck of a kayak allows more freedom of movement rather than trying to do repairs and reaching while twisting from the confines of a cockpit. Also, there are repairs that cannot be done easily (or at all) if the paddler is in their kayak. I suggest you get out with your kayaking partner and try this in calm water so you can use it if needed in a real situation. It can also be used for non-repair situations.
I have personally used this technique to empty water from my partners boat while keeping them out of the water. Sitting on my deck was a lot more attractive than swimming. The reason we didn't pump was too much water in the cockpit. Believe it or not this was faster. Please e-mail us if you find other ways of using this technique in non-repair circumstances.
Again, thank you Derek Hutchinson for sharing you experience and techniques with us.
Pictures seen above were taken from the USK Video Capsize Recoveries & Rescue Procedures
Wayne Horodowich, founder of The University of Sea Kayaking (USK), writes monthly articles for the USK web site. In addition, Wayne has produced the popular "In Depth" Instructional Video Series for Sea Kayaking.
Related Articles

It was mid-April, circa 2002. There were still patches of snow in the forest. It was one of those days…

Here's some tips and ideas for having a backup plan in case you lose a hatch cover during a trip or…

Well just like that, we are on the verge of starting a new year and I am still questioning what…

A kayaking buddy, we'll call him "Ben", is one heck of a paddler. He's got years of big, blue water…